# 一、开始
上一篇文章分析了Rollup的打包原理,这次来看一下Webpack。二者打包原理大同小异,都是从入口文件开始分析AST,递归收集依赖,然后生成最终的code。
Webpack和Rollup的插件都是各自贯穿始终的,Rollup的插件系统是自己实现的,在PluginDriver中。Webpack的插件系统则借助了Tapable,Tapable也是Webpack团队开发的,其本质是一种发布订阅模式。
深入理解插件对于深入理解Webpack非常重要。想一下,任何复杂的逻辑都可以抽象成一个插件,在相应的生命周期阶段去触发即可。
下面先介绍下插件用到的系统Tapable。
# 二、Tapable
# 1. 基础钩子
Tapable (opens new window)是独立发布的,也就是其可以搭配任何库。本次分析的是V2.2.1版本。
下面是Tabple的一些常见用法:
const { Synchook, AsyncParallelHook } = require('tapable')

class Car {
  constructor() {
    this.hooks = {
      // 创建新的钩子
      accelerate: new Synchook(['newSpeed']),
      brake: new SynHook(),
      calcRoutes: new AsyncParallelHook(['source', 'target', 'routeList'])
    }
  }
}
上面在Car类定义的时候定义了实例的hooks属性,它可以包含多个不同的hook。下面为这些hook增加订阅者。
const car = new Car();

// 为brake钩子增加订阅者,通常为插件,第一个参数为插件名称,第二个参数为回调函数。
car.hooks.brake.tap('WarningLampPlugin', () => warningLamp.on())
// 为accelerate钩子增加订阅者
car.hooks.accelerate.tap('LoggerPlugin', (newSpeed) => console.log(`现在车速为:${newSpeed}`))
SynHook代表是同步钩子,其只能用tap增加订阅者。相应的,还有异步钩子,支持异步插件。
// 使用tapPromise添加插件
car.hooks.calcRoutes.tapPromise('GoogleMapsPlugin', (source, target, routesList) => {
  // 返回一个Promise
  return google.maps.findRoute(source, target).then(route => {
    routesList.add(route);
  });
})

// 也可通过tapAsync添加插件,与tapPromise的不同之处是回调放在了最后一个参数
car.hooks.calcRoutes.tapAsync('', (source, target, routesList, callback) => {
  bing.findRoute(source, target, (err, route) => {
    if (err) return callback(err)
    routesList.add(route);
    // 调用callback
    callback();
  })
})

// 异步钩子也可以添加同步插件
car.hooks.calcRoutes.tap("CachedRoutesPlugin", (source, target, routesList) => {
  const cachedRoute = cache.get(source, target);
  if(cachedRoute)
    routesList.add(cachedRoute);
})
通过tap/tapPromise/tapAsync等添加订阅者后,就可以在相应的时机触发它们。
class Car {
  // ...
  setSpeed(speed) {
    // 触发同步钩子
    this.hooks.accelerate.call(speed)
  }

  useNavSystemPromise(source, target) {
    const routeList = new List();
    // promise的方式触发异步钩子,对应tapPromise
    return this.hooks.calcRoutes.promise(source, target, routeList).then(res => {
      return routesList.getRoutes();
    })
  }

  useNavSystemAsync(source, target) {
    const routesList = new List();
    // callAsync的方式触发异步钩子,对应tapAsync
    this.hooks.calcRoutes.callAsync(source, target, routesList, err => {
      if(err) return callback(err);
      callback(null, routesList.getRoutes());
    });
  }
}
上面是最简单的例子,Tapable的钩子按照回调执行方式可分为以下几种:
Basic。钩子名称中不带Waterfall、Bail、Loop,其回调的执行方式是按照添加的顺序依次执行。Waterfall。也是依次执行,不同的是执行过程中会把上一个回调的结果传给下一个回调。Bail。允许提前退出,当某一个回调返回非空值时,不再继续进行。Loop。插件执行中如果有一个不返回空,则又从第一个开始。也就是除非所有回调都返回空,否则会一直进行。
注意上面所说的返回空,仅指undefined,不包含null、''等。
另外,Tapable的钩子又可按照同步和异步分为以下类型:
Sync。同步钩子,只能用hook.tap()注册回调。AsyncSeries。异步钩子串行执行,可以用hook.tap()、hook.tapAsync()、hook.tapPromise()等方法注册回调。AsyncParallel。异步钩子并行执行,注册回调的方式同AsyncSeries。
上述两种分类的组合就是Tapable钩子真正的类型,体现在其暴露出的钩子名称上。比如AsyncSeriesWaterfallHook,就是Waterfall和AsyncSeries的结合,其允许异步回调并依次执行,并且前一个回调的返回值回传入下一个回调的参数中。
由于AsycnParallel异步并行钩子不能和WaterFall、Loop结合,因为前者是同时执行,后者是顺序执行,二者矛盾。所以最终结合后的钩子类型有3*4-2=10种:
SyncHookSyncBailHookSyncWaterfallHookSyncLoopHookAsyncParallelHookAsyncParallelBailHookAsyncSeriesHookAsyncSeriesBailHookAsyncSeriesLoopHookAsyncSeriesWaterfallHook
注意:
AsyncParallelBailHook执行过程中注册的回调返回非undefined时就会直接执行callAsync或者promise中的函数(由于并行执行的原因,注册的其他回调依然会执行)。AsyncSeriesBailHook执行过程中注册的回调返回(resolve)非undefined时就会直接执行callAsync或者promise中的函数,并且注册的后续回调都不会执行。AsyncSeriesWaterfallHook中上一个注册的异步回调执行之后的返回值会传递给下一个注册的回调。
# 2. 拦截器
Tapable中也实现了拦截器功能,其可以在注册/执行回调等过程中触发。
拦截器的类型有:
register:定义tap/tapAsync/tapPromise时触发。call:执行call/callAsync/promise时触发。tap:执行tap/tapAsync/tapPromise定义的内容时触发。loop:loop类型的钩子执行时触发。
car.hooks.calcRoutes.intercept({
  call: (source, target, routesList) => {
    console.log("Starting to calculate routes");
  },
  register: (tapInfo) => {
    console.log(`${tapInfo.name} is doing its job`);
    return tapInfo;
  }
})
# 3. HookMap/MultiHook
另外Tapable还提供了HookMap和MultiHook等功能。
HookMap是一个Hooks映射的帮助类,实际就是一个hook的key-value数组。MultiHook就是把其他的hook转化为一个新的hook。
Tapable的核心还是上面,这些是辅助工具。
# 4. Tapable实现原理
Tapable实现原理比较简单,其暴露出来的各种Hook,比如SyncHook、SyncBailHook等,都继承自Hook类。
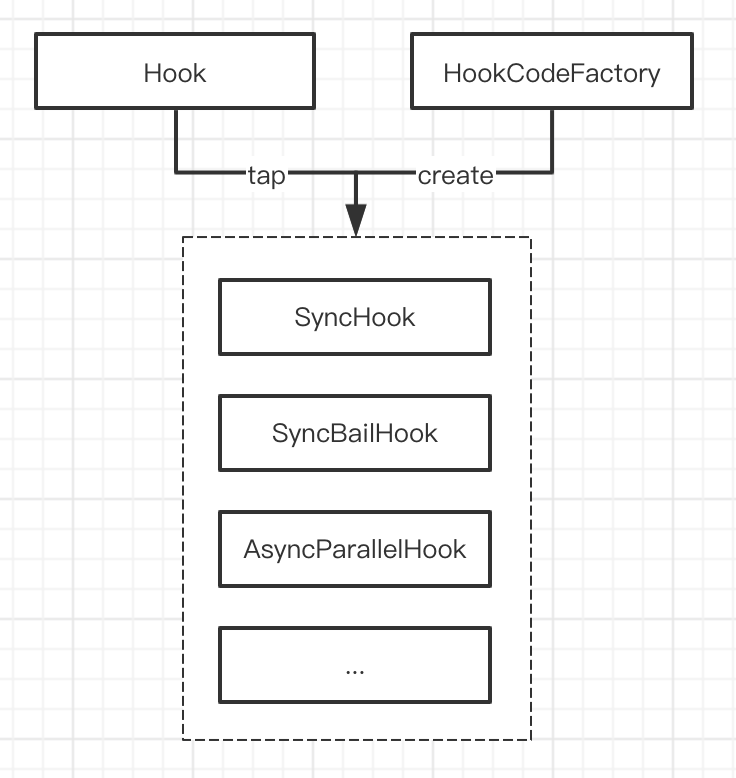
tap方法定义在Hook基类上,调用tap的时候,会执行this._insert方法,最终在this.taps[i]处增加一个新的回调。
call方法也定义在Hook基类上,但是它的调用链比较长,call => this._createCall => this.compile,最后这个compile方法是在每个具体的Hook类上重新定义的:
class SyncHookCodeFactory extends HookCodeFactory {
  // ...
}
const factory = new SyncHookCodeFactory();

const COMPILE = function(options) {
  factory.setup(this, options);
  return factory.create(options);
}
function SyncHook() {
  // ...
  hook.compile = COMPILE
}
看上面的COMPILE方法,factory.setup方法只是赋值了一些变量,所以call方法核心是通过factory.create方法创建的,其会根据每个Hook的不同种类生成不同的调用方法,比如同步/异步执行、提前终止、传入上一个回调的结果等。
class HookCodeFactory {
  // ...
  create(options) {
    switch (options.type) {
      case "sync":
        fn = new Function(
          this.args(),
          '"use strict";\n' +
          this.header() +
          this.contentWithInterceptors({
            onError: err => `throw ${err};\n`,
            onResult: result => `return ${result};\n`,
            resultReturns: true,
            onDone: () => "",
            rethrowIfPossible: true
          })
        );
      break;
      // ...
    }
  }
}
由于不是本文的重点,Tapable就不再展开了。
# 三、Webpack原理
下面仅分析主要流程,对于watch、HMR等功能暂不涉及。本次分析的Webpack版本是V5.62.1,
# 1. 总览
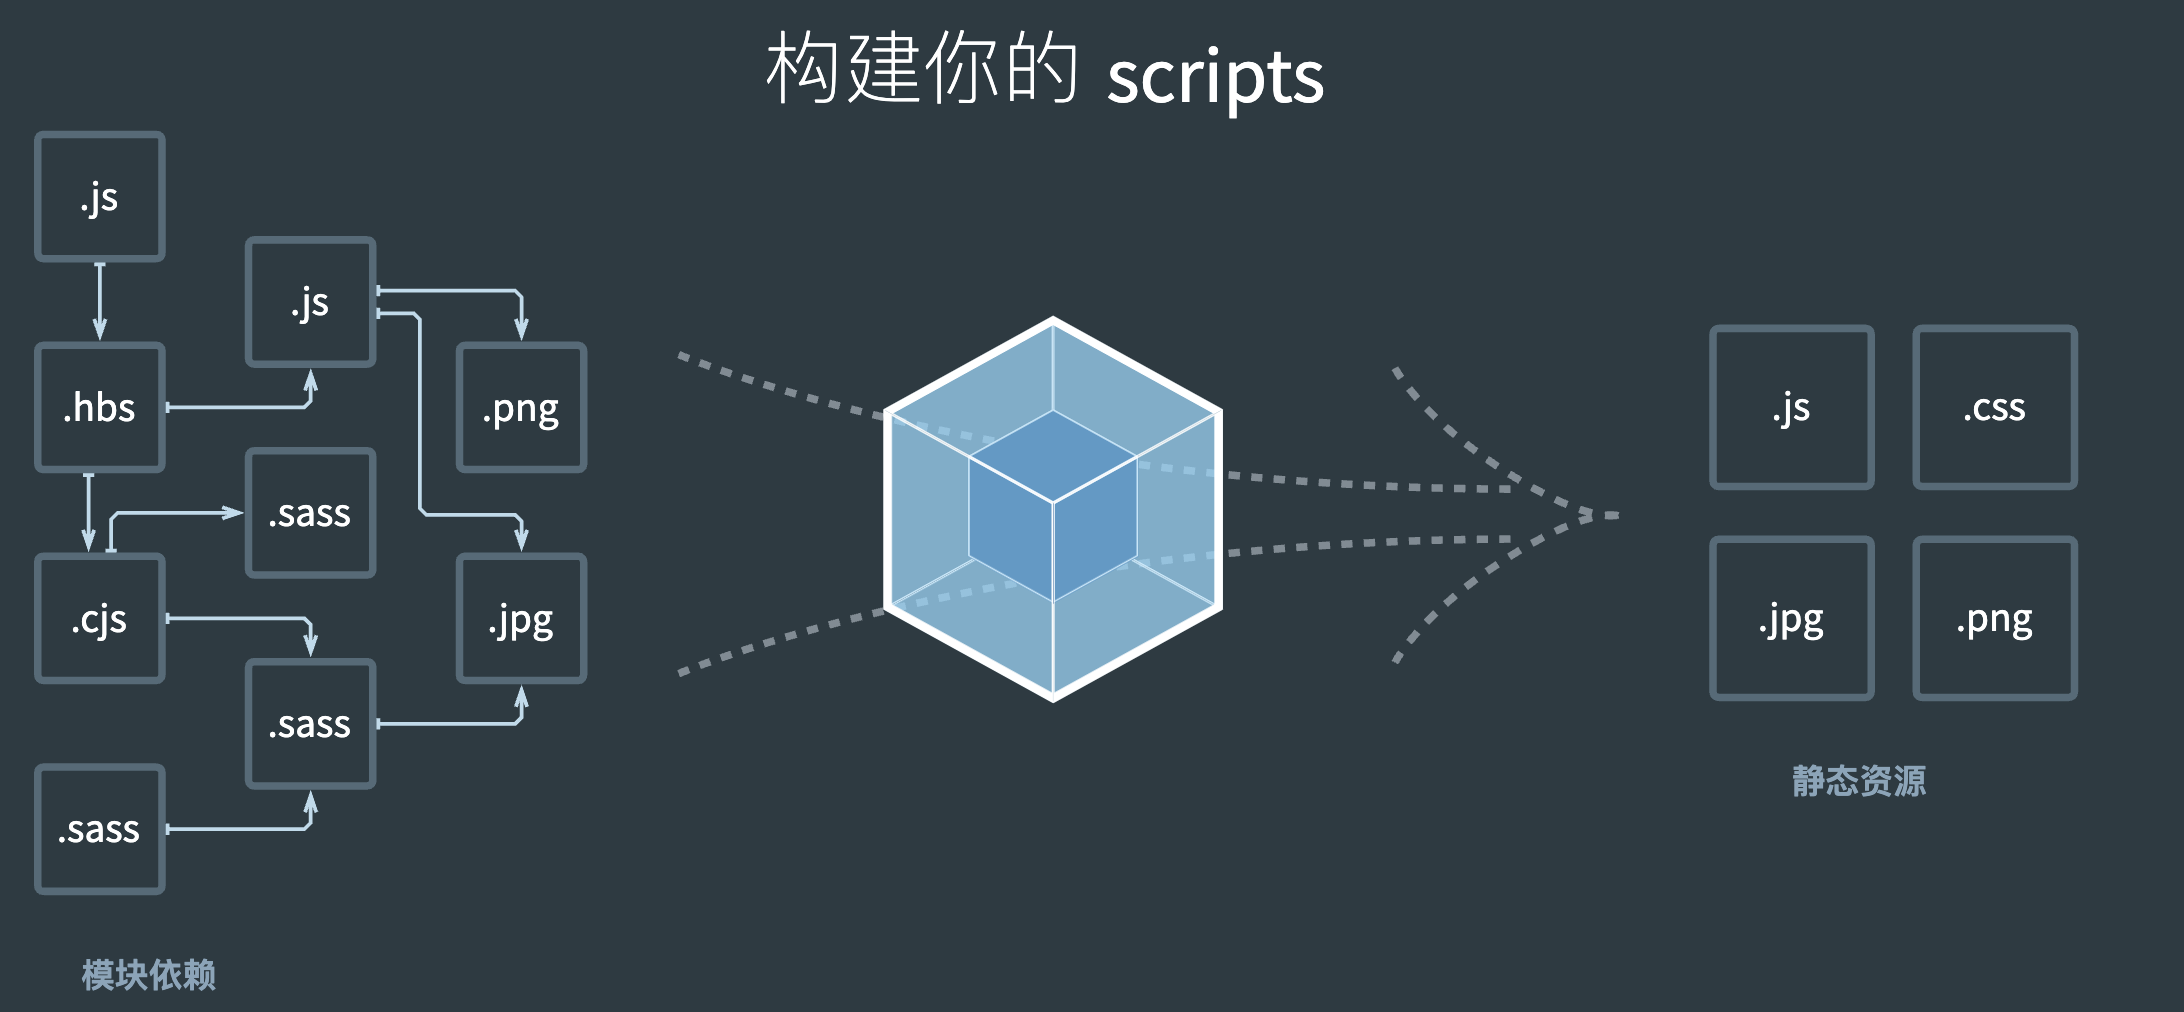
Webpack打包流程包含三个阶段:
- 初始化阶段:包含了初始化参数,创建
Compiler,开始执行compiler.run。 - 构建阶段:从
entry开始创建Module,调用loader转为JS,解析JS为AST,收集依赖,并递归创建Module。 - 生成阶段:根据入口和模块的依赖关系,生成
Chunk,输出到文件。
Webpack打包流程中有很重要的两个概念:compiler和compilation。
compiler:一次打包流程只会创建一个,贯穿整个编译过程。compilation:在watch为true的时候,每次文件变更触发更新都会生成新的compilation。
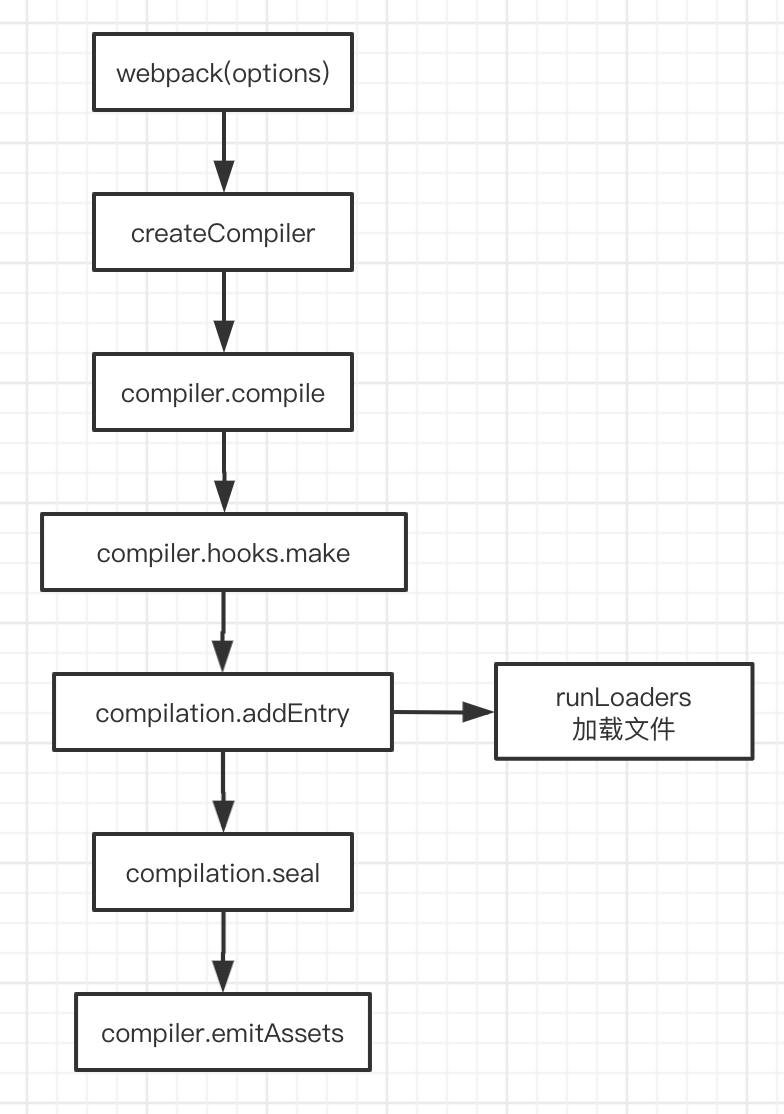
# 2. 初始化阶段
下图是Webpack初始化阶段的流程图:

我们使用Webpack的方式一般是通过wepback-cli,从webpack-cli的bin文件开始,其调用链大致如下:
class WebpackCLI {
  async run() {
    // 加载webpack,可以理解为require('webpack')
    this.webpack = await this.loadWebpack()
    const options = [].concat(/* shell配置和配置文件 */)
    this.runWebpack(options)
  }

  async runWebpack(options) {
    const callback = () => {/* 错误处理等回调 */}
    await this.createCompiler(options, callback);
  }

  await createCompiler(options, callback) {
    this.webpack(
      options,
      callback
    )
  }
}

const runCLI = (args) => {
  const cli = new WebpackCLI()
  cli.run(args)
}

runCLI(process.argv);
可以看到最终调用了Webpack库的webpack方法。
webpack方法定义在lib/webpack.js中:
function webpack = (options, callback) => {
  const create = () => {
    const compiler = createCompiler(options)
    return { compiler }
  }
  // ...
  if (callback) {
    const { compiler } = create()
    compiler.run(() => {})
  }
}
webpack首先调用createCompiler创建了一个compiler,然后调用了compiler.run方法。
下面先看一下createCompiler方法:
function createCompiler(rawOptions) {
  const options = getNormalizedWwebpackOptions(rawOptions)
  const compiler = new Compiler(options.context, options)
  if (Array.isArray(options.plugins)) {
    for (const plugin of options.plugins) {
      if (typeof plugin === "function") {
        plugin.call(compiler, compiler);
      } else {
        plugin.apply(compiler);
      }
    }
  }

  compiler.hooks.environment.call();
  compiler.hooks.afterEnvironment.call();
  new WebpackOptionsApply().process(options, compiler);
  compiler.hooks.initialize.call();
  return compiler
}
createCompiler先对options进行了一些标准化,然后通过new Compiler创建了一个compiler,然后依次执行了optiosn.plugins和compiler.hooks上的几个钩子。然后调用了new WebpackOptionsApply().process()。
下面看一下Compiler:
class Compiler {
  constructor() {
    this.hooks = Object.freeze({
      initialize: new SyncHook([]),
      shouldEmit: new SyncBailHook(['compilation']),
      // 其他一系列钩子的定义
    })
  }
}
可以看到Compiler的构造函数中主要是定义了一系列钩子,这些钩子在构建的生命周期中会被依次调用。
然后再看一下WebpackOptionsApply:
class WebpackOptionsApply {
  process(options, compiler) {
    // 执行plugins
    // new SomePlugin().apply()

    new EntryOptionPlugin().apply(compiler);
    compiler.hooks.entryOption.call(options.context, options.entry);
    //...
  }
}
在new WebpackOptionsApply().process()方法中,执行了很多内部plugin,其中比较重要的是EntryOptionPlugin的执行。
class EntryOptionPlugin {
  apply(compiler) {
    compiler.hooks.entryOption.tap('EntryOptionPlugin', (context, entry) => {
      EntryOptionPlugin.applyEntryOption(compiler, context, entry);
      return true;
    })
  }

  static applyEntryOption(compiler, context, entry) {
    const EntryPlugin = require("./EntryPlugin");
    for (const name of Object.keys(entry)) {
      const desc = entry[name];
      // 整理entry的options,使之返回统一的格式
      const options = EntryOptionPlugin.entryDescriptionToOptions(
        compiler,
        name,
        desc
      );
      for (const entry of desc.import) {
        new EntryPlugin(context, entry, options).apply(compiler);
      }
    }
  }
}
看一下new EntryPlugin().apply()做了什么:
class EntryPlugin {
  apply(compiler) {
    compiler.hooks.compilation.tap('EntryPlugin',
      (compilation, { normalModuleFactory }) => {
        compilation.dependencyFactories.set(
          EntryDependency,
          normalModuleFactory
        );
      })

    const { entry, options, context } = this;
    const dep = EntryPlugin.createDependency(entry, options);

    compiler.hooks.make.tapAsync("EntryPlugin", (compilation, callback) => {
      compilation.addEntry(context, dep, options, err => {
        callback(err);
      });
    });
  }
}
EntryPlugin在apply方法执行的时候,会在compiler.hooks.make上注册一个插件,其回调为compilation.addEntry,即开始从入口解析、收集依赖等,从这步开始进入了我们的构建阶段。
回到webpack方法中,创建compiler后,调用了compiler.run方法,来看一下run方法:
class Compiler {
  run (callback) {
    const onCompiled = (err, compilation) => {
      this.hooks.shouldEmit.call(compilation)
      this.hooks.done.callAsync(() => {})
      this.emitAssets(compilation, () => {
        this.emitRecords(() => {})
      })
    }
    this.hooks.beforeRun.callAsync(() => {
      this.hooks.run.callAsync(() => {
        this.compile(onCompiled)
      })
    })
  }
  compile(callback) {
    const params = this.newCompilationParams();
    this.hooks.beforeCompile.callAsync(params, () => {
      this.hooks.compile.call(params);
      const compilation = this.newCompilation(params);

      this.hooks.make.callAsync(compilation, () => {
        this.hooks.finishMake.callAsync(compilation, () => {
          compilation.finish(() => {
            compilation.seal(() => {
              this.hooks.afterCompile.callAsync((err) => {
                if (err) return callback(err)
                return callback(err, compilation)
              })
            })
          })
        })
      })
    })
  }
  emitRecords(callback) {
    this.outputFileSystem.writeFile();
  }
}
compiler.run方法先触发了hooks.beforeRun和hooks.run两个钩子,然后执行了this.compile方法。
compile方法也是也触发了几个前置回调hooks.beforeCompile和hooks.Compile,然后创建了compilation对象,之后触发了make等回调,make是构建的核心,他注册的就是上面提到的entryPlugin,此时已经进入构建阶段。
我们先忽略阶段,把compile方法看完。
compile接着调用了compilation.finish、compilation.seal、hooks.afterCompile,之后调用了传入的callback,这里的callback就是run方法中onCompiled。onCompiled就是编译完成做的事情,也是执行了一些回调:shouldEmit、done和this.emitAssets、this.emitRecords。
compilation.seal方法就到了生成阶段,我们下面会讲到。
小结下初始化阶段做的事情:合并options、创建compiler、注册插件、执行compiler.run、创建compilation等。
# 3. 构建阶段
下图是构建阶段的流程图:
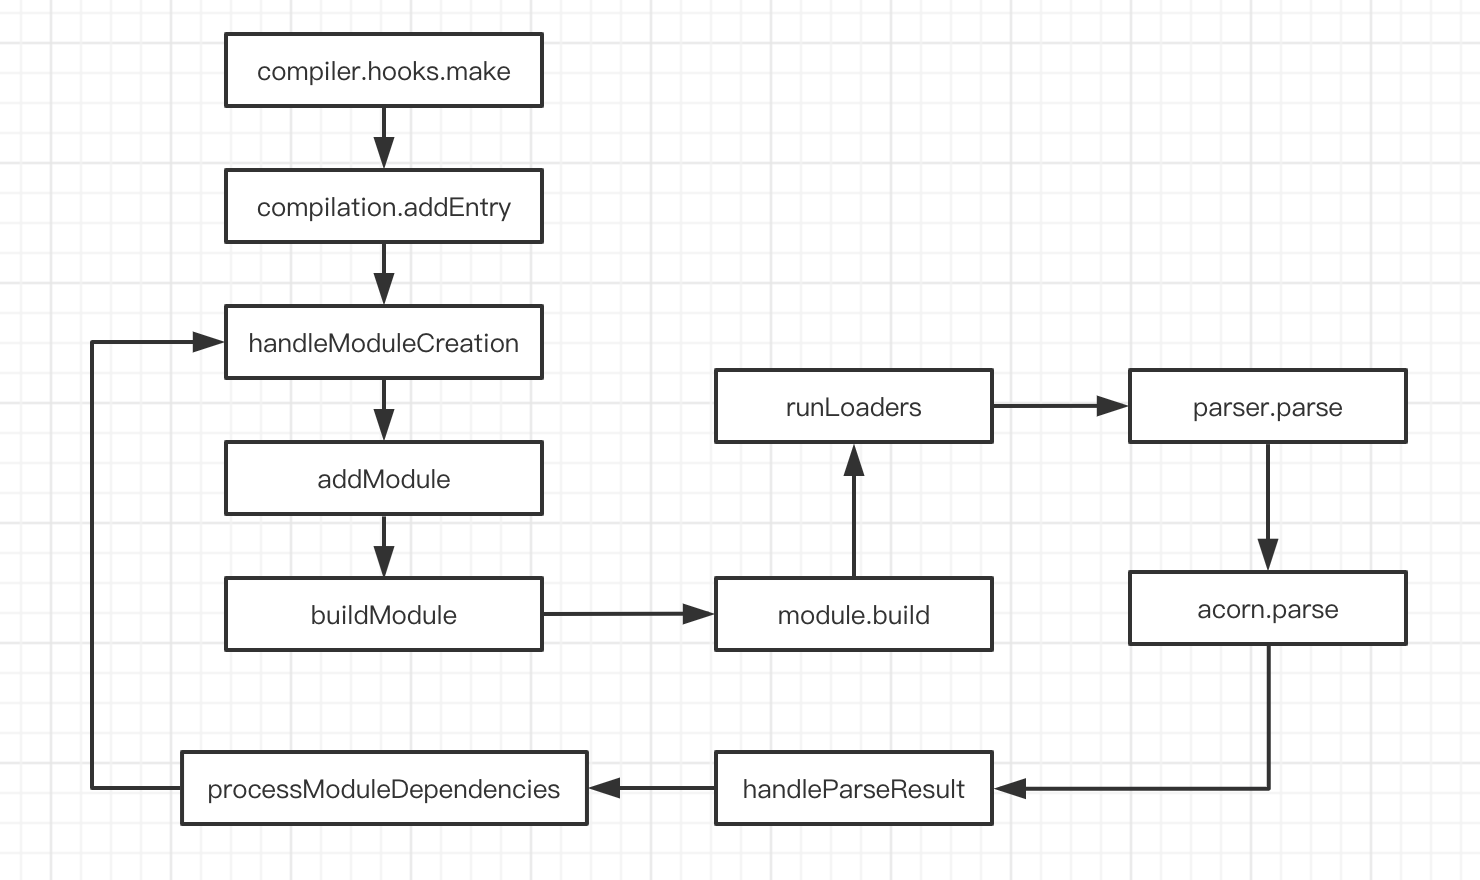
构建阶段从make钩子触发的compilation.addEntry开始,我们上面讲过构建阶段的本质是从入口开始分析AST,收集依赖。
Webpack的构建阶段调用链比较长:
- this.addEntry (opens new window) =>
- this._addEntryItem (opens new window) =>
- this.addModuleTree (opens new window) =>
- this.handleModuleCreation (opens new window) =>
- this.addModule (opens new window) =>
- this._handleModuleBuildAndDependencies (opens new window) =>
- this.buildModule (opens new window) =>
- this._buildModule (opens new window) =>
- module.build (opens new window) =>
- module._doBuild (opens new window) =>
- runLoaders (opens new window) =>
- this.parser.parse (opens new window) =>
- handleParseResult (opens new window) =>
- processModuleDependencies (opens new window) =>
- handleModuleCreation (opens new window)
看一下上面比较重要的环节:
handleParseResult作用是处理模块依赖。processModuleDependencies是buildModule的回调,其会调用handleModuleCreation,这样对于新增的依赖,会创建新的module,回到了第一步,递归就是在这里实现的。
注意这里的AST解析是利用acorn实现的:
const { Parser: parser } = require("acorn");

class JavascriptParser extends Parse {
  parse(source) {
    // ...
    const ast = parser.parse(source)
  }
}
其他部分大家可点击上面方法的超链接去查看源代码,这里就不展开了,下面我们还会手写一个例子深入理解这部分。
# 4. 生成阶段
生成阶段的流程图如下:
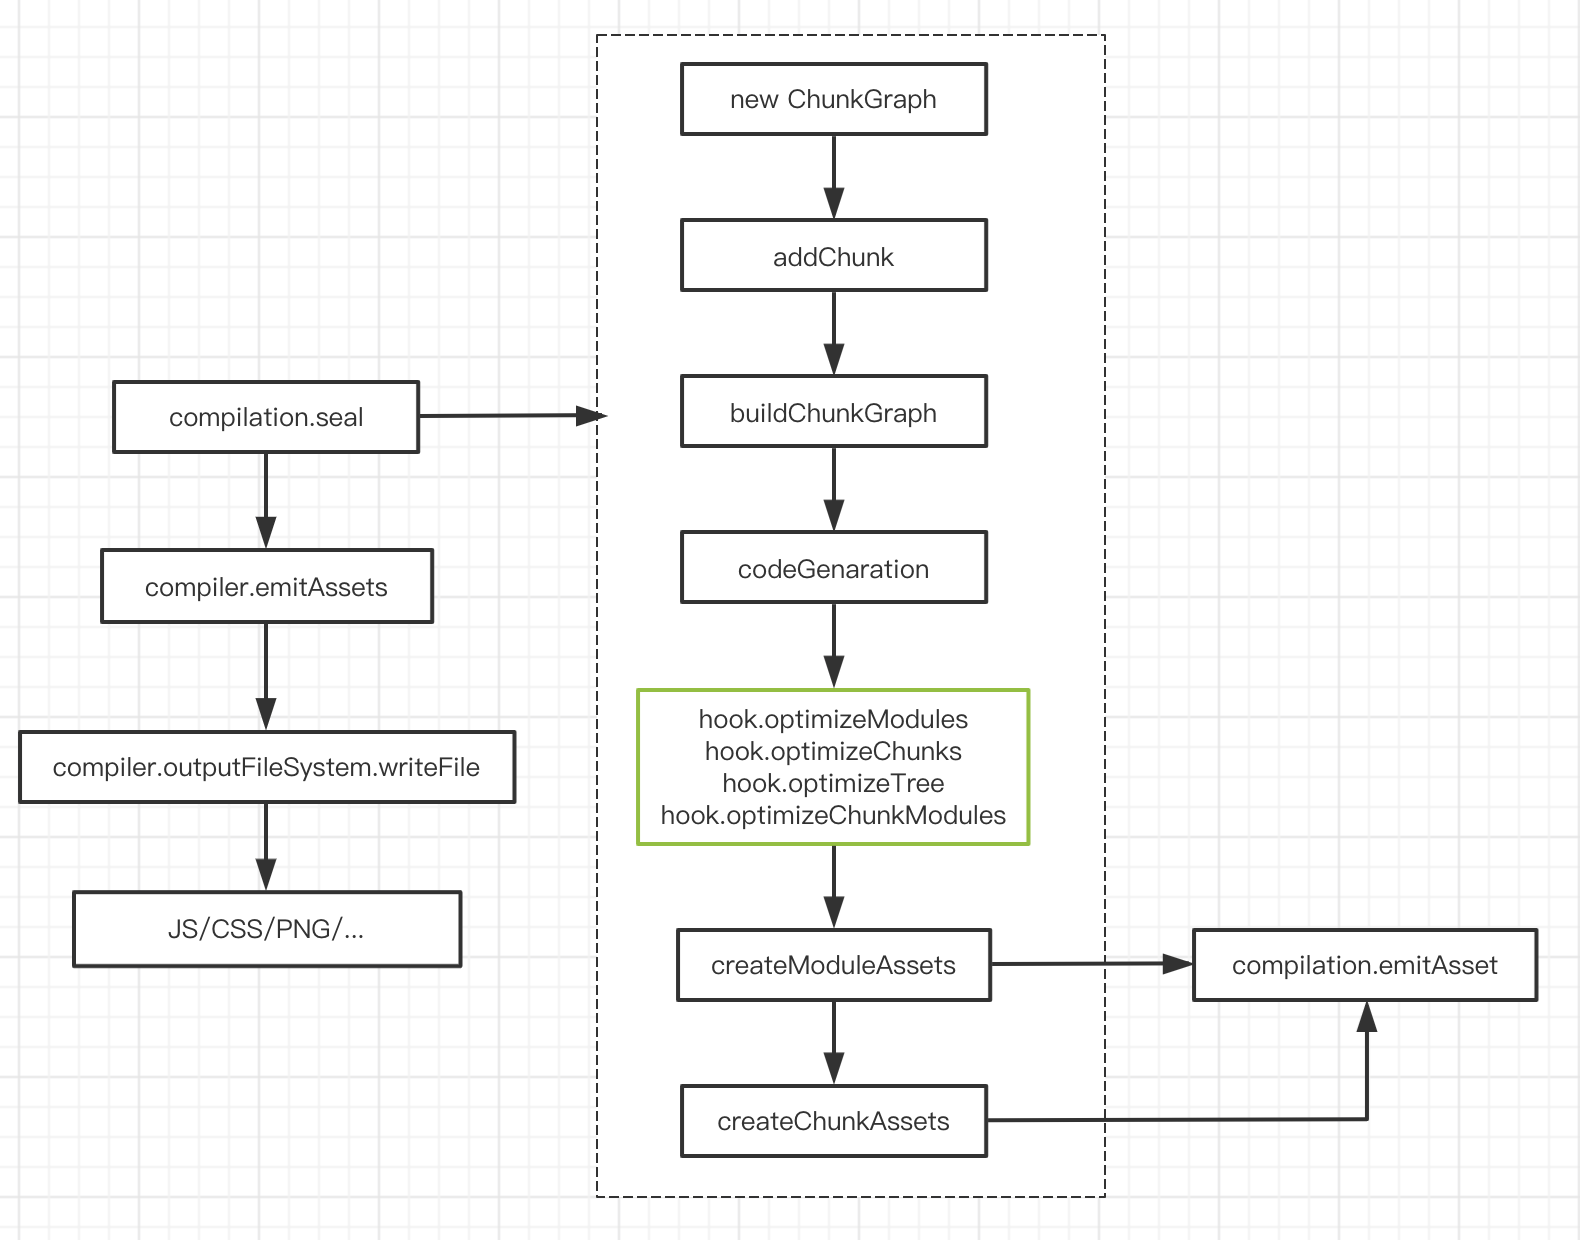
生成阶段从上面提到的compilation.seal开始:
class Compilation {
  seal(callback) {
   const chunkGraph = new ChunkGraph()
   this.addChunk();
   buildChunkGraph();
   this.hooks.optimizeModules.call()
   this.hooks.afterOptimizeModules.call()
   this.hooks.optimizeChunks.call()
   this.hooks.afterOptimizeChunks.call()
   this.hooks.optimizeTree.call()
   // ...
   this.createModuleAssets();
   this.createChunkAssets();
  }

  createChunkAssets() {
    this.emitAsset()
    // ...
  }
  createModuleAssets() {
    this.emitAsset()
  }
}
执行完compilation.seal后,会执行其回调,也就是上面提到的onCompiled方法,也就是this.outputFileSystem.writeFile(),即把内存中的chunk信息存入文件系统。
下面总结下生成阶段做的事情:
- 创建
ChunkGraph - 遍历
modules,将module分配给不同的chunk - 调用
createChunkAssets和createModuleAssets分别将chunk和module将assets信息写入到compilation.assets中 - 调用
seal回调,执行outputFileSystem.writeFile,写入文件。
# 四、手写打包核心原理
如果看到这里你还是云里雾里,可以手写一下打包核心原理来加深印象。
Webpack功能复杂、模块众多,其核心逻辑被一层层封装。熟读其源码可以理解其架构,但对于核心原理,还是手写一下印象最深。
下面这个打包例子与Webpack用的库不一致,但是打包思想是一样的。
先创建parser.js,导出几个方法:
getAST:利用@babel/parser生成ASTgetDependencies:利用@babel/traverse遍历AST,获取依赖transform:将AST转为code,并转化其中的ES6语法。
const fs = require('fs');
const parser = require('@babel/parser')
const traverse = require('@babel/traverse').default
const { transformFromAst } = require('babel-core')

module.exports = {
  getAST: path => {
    const source = fs.readFileSync(path, 'utf-8')
    return parser.parse(source, {
      sourceType: 'module'
    })
  },
  getDependencies: ast => {
    const depencies = []
    traverse(ast, {
      ImportDeclaration: ({node}) => {
        depencies.push(node.source.value)
      }
    })
    return depencies;
  },
  transform: ast => {
    const { code } = transformFromAst(ast, null, {
      presets: ['env']
    })
    return code;
  }
}
再创建compiler.js:
const path = require('path');
const fs = require('fs')
const { getAST, getDependencies, transform } = require('./parser')

class Compiler {
  constructor(options) {
    const { entry, output } = options
    this.entry = entry;
    this.output = output
    this.modules = [];
  }

  run () {
    const entryModule = this.buildModule(this.entry, true);
    this.modules.push(entryModule);
    this.walk(entryModule);
    // console.log('modules', this.modules)
    this.emitFiles();
  }

  walk(module) {
    const moduleNameMap = this.modules.map(item => item.filename)
    module.dependencies.map(dep => {
      if (!moduleNameMap.includes(dep)) {
        const newModule = this.buildModule(dep)
        this.modules.push(newModule);
        this.walk(newModule)
      }
    })
  }

  buildModule(filename, isEntry) {
    let ast;
    if (isEntry) {
      ast = getAST(filename)
    } else {
      const absolutePath = path.resolve(process.cwd(), './webpack/demo', filename)
      ast = getAST(absolutePath)
    }
    return {
      filename,
      dependencies: getDependencies(ast),
      transformCode: transform(ast)
    }
  }

  emitFiles() {
    const outputPath = path.join(this.output.path, this.output.filename)
    let modules = ''
    this.modules.map(_module => {
      modules += `'${_module.filename}': function(require, module, exports) {${_module.transformCode}},`
    })

    const bundle = `
      (function(modules) {
        function require(filename) {
          const fn = modules[filename];
          const module = { exports: {} };
          fn(require, module, module.exports);
          return module.exports;
        }
        require('${this.entry}')
      })({${modules}})
    `

    fs.writeFileSync(outputPath, bundle, 'utf-8')
  }
}
compiler.js的核心逻辑在run方法中,其从入口开始创建module,然后递归的收集依赖,最后调用emitFiles输出到文件中。
注意输出的时候,创建了自执行函数,此时的传入的参数是一个对象,其key值为模块地址,value值为模块内容。然后调用自定义的require函数,传入第一个module,然后依次执行。
一个基本的打包器就是这么简单。
下面创建几个文件测试一下:
// a.js
export const a = 1;

// b.js
import { a } from './a.js'
export const b  = a + 1;

// index.js
import { b } from './b.js'
console.log(b + 1)
然后引入我们的简易打包器,打包试一下:
// main.js
const Compiler = require('./compiler')
const config = {
  entry: path.join(__dirname, './index.js'),
  output: {
    path: path.join(__dirname, '../dist'),
    filename: 'bundle.js'
  }
}

function main(options) {
  new Compiler(options).run();
}

main(config)
执行上面的main.js,就可以在dist目录下看到打包出的bundle.js。
我们可以新建一个index.html引入我们的bundle文件,打开console面板,就能看到打印的内容了。
上面例子的地址在这里 (opens new window)。
# 五、总结
本文分析了Tapable插件的使用和原理,讲解了Webpack主要流程,并手写了一个简易打包器。
Webpack和Rollup打包原理大同小异,理解其打包原理有利于更好的使用这些工具。